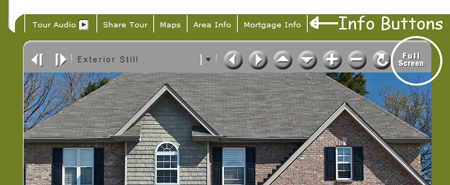
Your tour visitors really have a wealth of information right at their finger tips. That’s why over 80% of home buying research starts on the web! This post will take a look at our tour window buttons and links that are available to be customized. You are reading installment number 3 of my educational series on maximizing the benefits of your SpotLight virtual tour.

Virtual Tour Viewer Buttons
Just above the image viewer window you’ll see a row of buttons. Some are hidden. Try moving your mouse over the visible buttons to reveal even more buttons. Just about any of these buttons can be turned off individually. Other buttons also have default hyperlinks to other documents or websites with the option to change the link to whatever you’d like. Let’s take a look at the links we’re able to customize:
Full Screen: At the upper right of the image viewer is a Full Screen button. I’ll bet you can guess what it does! That’s right, your visitor’s entire display is filled with the images of your property, immersing them even further into the experience. This was introduced in early 2010 and older tours are NOT automatically upgraded to have full-screen capability. But they can be. Let us know if you’re interested in having your older tours upgraded to full screen.
Your Email: You can have tour inquiries sent to your email address of choice.

Links to the agent or owner's info.
Your Website: You can have the tour link to any page on any site you wish. This could be useful if you wish to create a landing page specifically to welcome your tour viewers.
Floor Plan: This button can link to either a static floor plan document or one of our interactive floor plans.
Brochure: If you have a brochure created for the property you can link to an electronic version of it with this button. If you don’t use brochures but would like to let us know. We can help.
Map and Satellite views: The viewer uses Google Maps by default.
City Info: This button can link to a site of your choice, but unless otherwise specified I will link it to your chamber of commerce or city’s website. If you’ve found an article online that praises your city, we can link to that as well.
Schools: I normally link this button to the county or city school system applicable to the property.
Mortgage Info: By default this button links to the RTV mortgage calculator which is a useful tool. If you have your own mortgage calculator or you have partnered with a specific lender you may include that link here. This could also be used as ad space similar to the affiliate banner area. (more about that in my next post in this series)
Video / Wildcard button: This is one button that can even have the name customized. Most of the time it’s used for linking to a video that you may have produced either of the property or of yourself talking about the property or business. This button is off by default, but I wanted you to know it was available. If you need help with video production let us know.

Virtual Tour Social Networking Buttons
Social Networking Buttons: In 2009, RTV introduced social networking buttons built right in to the tour. This allows you and your tour visitors to link the tour to their social networks to share with friends, family and colleagues. These buttons are on by default, but if you don’t want them for any reason they may be turned off. Use these generously to spread the word about your tours far and wide!

Virtual Tour Scene Infor or "Spinfo"
Spinfo: This is the text that shows up below the image viewer in the non-full-screen tours. It shows up when you mouse overt the “i” icon on full-screen enabled tours. Normally I grab and edit the blurb you already have on your listing, and include the same text on every scene, but you can have anything you’d like included here on a per-scene basis.
Unbranded tour: Most MLS sites require any tour to be unbranded. This means that the listing agent’s logo can’t be visible on the tour. Each tour that we produce comes with a special link that has the image window and the viewer controls only to comply with MLS guidelines.
Well, I’ll wrap it up there. I knew this would be one of the longer posts in this series, but there really was a lot to cover. I hope you get the idea that you have control over just about all of the buttons and links in your tours.
Don’t miss a single installment in this series. Subscribe to my RSS Feed or Follow me on Twitter.

